Showing posts with label landscape quilting. Show all posts

Wednesday, February 23, 2022

New Landscape Quilt


The other landscape quilt isn't panning out, I just can't get into it so I thought put it away for another day.

So I started on the winter oak landscape and I am loving it. It isn't quite finished, but I think the rest of the details will be added with machine stitches, rather than gluing on more fabric or trying to change colours with markers.

So now it is pinned to the batting and backing fabric and ready for some free-motion quilting. I may add a hint of sunshine to the leaves with gold thread, because the markers just aren't doing it. Gold thread may pick up the glint that I am after. And the dry grasses that are in the snow will be added by stitches as well. A slow process but a fascinating one. More later.

Tuesday, November 30, 2021

A new landscape quilt wall hanging

I am starting a new landscape quilt. This one will be an old picket fence, inspired by the one in Nancy Zeiman and Natalie Sewell's book.
I began with a batik cotton from Quilter's Curve in Combermere, Ontario. It is a light teal background with swirls through it. They could easily come across as shafts of sunlight in the finished wallhanging.

I then cut pieces of a grey mottled batik for the fence posts, but they just didn't seem right. So I went with a clear white cotton shirting fabric that I had, and did a lot of colouring with oil pastels, crayons and permanent markers.

This is just the start, I may add even more shading to the posts once I add more details to the quilt. It has to look like old wood, with that weathered look of mold and dirt aged by time.

There will be a lot of fussy cutting to this quilt. Lots of individual leaves and flowers to be cut, that will then be stitched over the fence to look as if they have always been there. I am so looking forward to this project.

Monday, March 8, 2021

Landscape quilt finished

Wallhanging finished and hung up

I have finished all the sewing on my second landscape quilt wall-hanging. I can see lots of things that need improving, such as using fusible web when applying large pieces of fabric. The bird house and the window would have been better if I had done that, less rippling would have occurred. But I figure it is all a learning curve and I am content to leave this one as is. Things that I see could be improved will be incorporated into my next and subsequent efforts. I already have another one in mind. It is interesting that the part I found the hardest, the leaves, has turned out to be my favourite aspect of this. Perhaps it is the colour, but I just love the leaf section.
The project is still mounted on the styrofoam board that I used to work on it. This also serves for blocking my knits. Such a useful piece of styrofoam. I will hang this wall hanging on a wall, once I figure out where to put it. It is called "All in the Family" because that is what the original artist called his painting.

Thursday, February 25, 2021

Landscape Quilting in progress


My second landscape quilting project.  Most people, when they think of landscape quilting, think of strips of fabric sewn onto a background piece to resemble great swaths of countryside.  That isn't the landscape quilting that I was introduced to and I prefer something with much greater detail. I think it is rather like one's taste in art; I have never been drawn to modern art or interpretative art, but I love art that is completely realistic.  I love the use of the artist's brush to make details that are so true-to-life, better even than photography because they have been rendered by hand.  

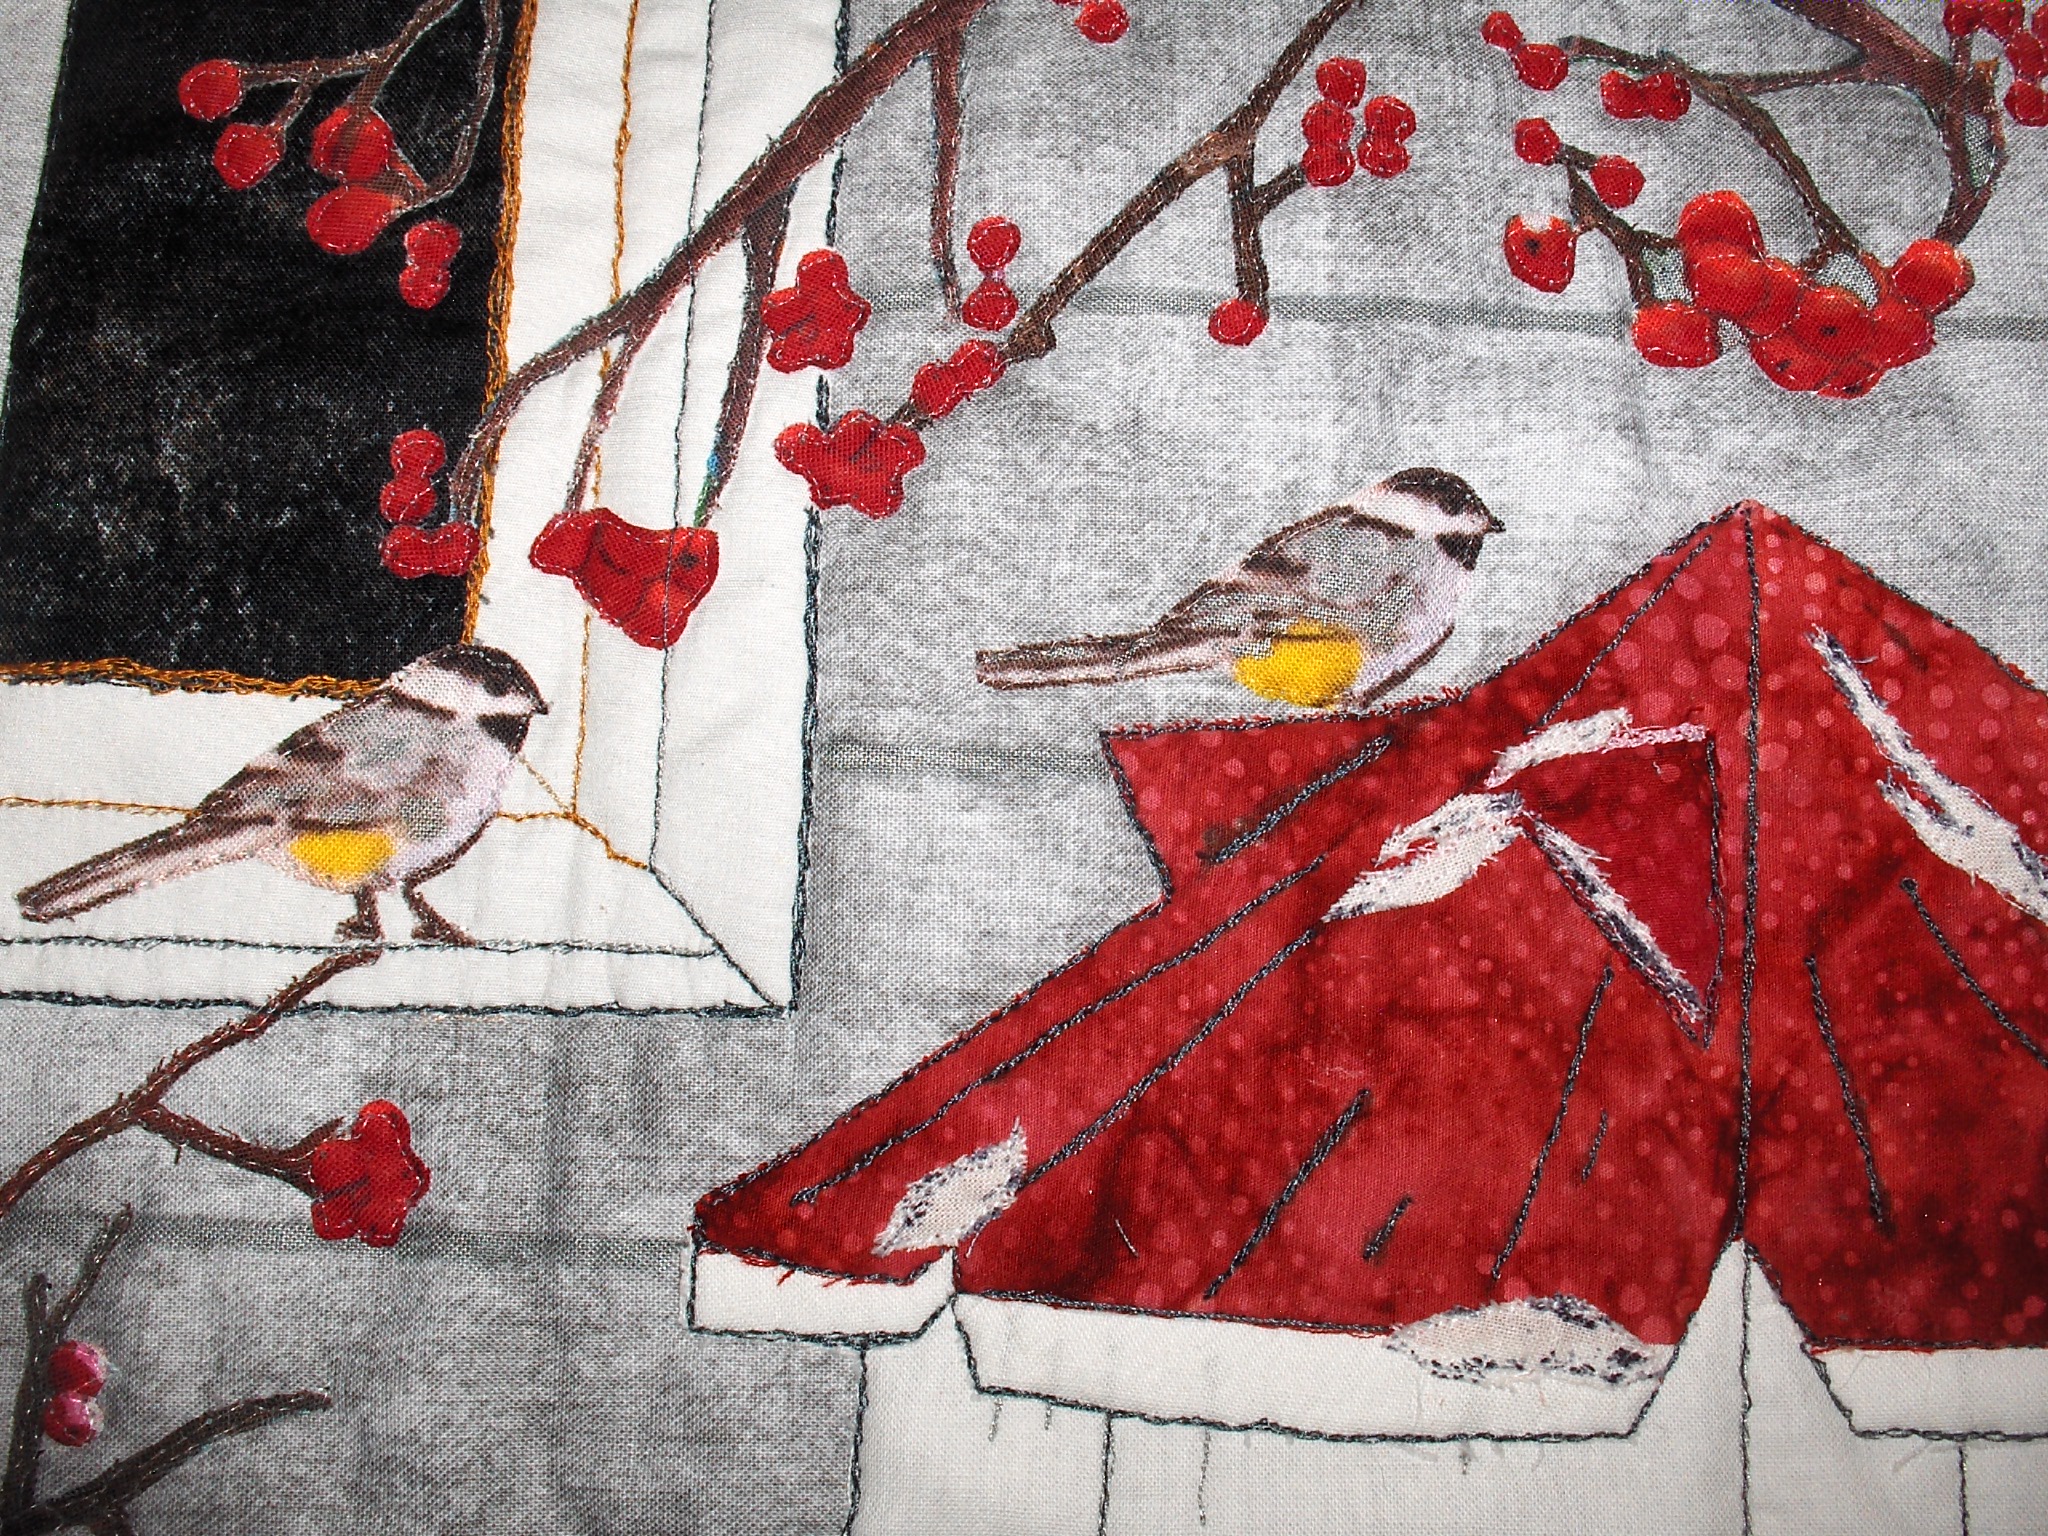
I have tried to reproduce in fabric what one man did with his paintbrush. He called it All in the Family, a scene of birds coming to a feeder and bird house in winter, against a background of a house with wood siding and holly branches. 


The artist is William Mangum and I discovered him through a zigsaw puzzle that I did. 

file:///home/chronos/u-5c38bd7175b50a50d3345622b01465c5e43fcc0e/MyFiles/bird%20feeder/All%20In%20The%20Family%20-%20Limited%20Edition%20-%20William%20Mangum%20Fine%20Art.mhtml


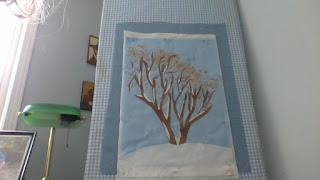
And this is my effort so far. I have cut all the fabric pieces and sewn them onto a background fabric that is a mottled grey. The sewing is free-motion quilting through three layers, the background fabric, a light quilt batting, and another fabric for the backing. The stitching is done with invisible thread on the top and a thread to match the backing in the bobbin.


The completed wall-hanging is 13 by 24 inches, about the same size as the original painting.


I only had access to chickadees for my birds, so all of them are the same type of birds. I don't have the variety that Mangum had in his painting.  If I find fabric with other birds that are the right size, I can always sew them on top of the birds there now.

A close up of the project, perhaps you can see the free-motion stitches

What is left to do now is to bind the quilt.  I will use the same fabric as the one used for the window top left.  The binding will be a narrow 3/8" binding, I won't do a double binding as I want the image to be the prime focus.  After that, I am going to do shading with oil and wax pastels in order to simulate the shadows that are in the painting.  

Perhaps this will never be finished!  I have been working on it for over a month now, I always see something new that should be done.  But I have thoroughly enjoyed the whole exercise. I don't think I have been so engrossed in anything for a long time; two hours at the sewing machine flies by and I look forward to more of these landscape quilts in the future. 

I will post a picture of the finished wall hanging once the binding is on and the shading is complete.


Sunday, December 27, 2020

Landscape quilting progress

Today I tackled the mitered borders on the landscape quilt.  Although far from perfect, I am satisfied with the results and will move forward. Next step is to bind the quilt  (easy as I have done a lot of binding in my sewing years)  and then the fun part, free motion stippling.  That will be the best part of this whole project.


I chose a subtle printed cotton in the same orangey-gold shade of some of the flowers to be the inner narrow border. A 1-inch wide strip was sewn to 4" wide strips of the background fabric.  They were then sewn to the trimmed quilt picture, and I spent several hours trying to get the miters as good as possible. I resorted to hand sewing two of the miters as I just could not get them right on the machine. I doubt that my miters are actually 45 degrees, but who is checking?  


Now I can see that you want a bigger picture to begin with as there isn't that much area for stippling. Not to worry, there are going to be more of these quilts in my sewing future. I already have a second one planned in my mind and am anxious to get fussy cutting for that one. 

Overall, I am fairly pleased with my final result here, I will post once more with the finished quilt, once it is bound and stippled, blocked and hung on the wall. 

My thanks to Nancy Zeiman and Natalie Sewell for their wonderful books on landscape quilting. I often thought of Nancy as I was making this, and I hope to meet her one day in the great beyond.


Sunday, December 20, 2020


I am trying my hand at landscape quilting. Recently diagnosed with rheumatoid arthritis in my hands, I have found most hand activities too painful to do. But I can't live without fabric creations (or gardening for that matter) and I thought perhaps I could cut and assemble pictures with fabric.

Inspired by the late Nancy Zeiman and her friend Natalie Sewell, I took this project from one that Natalie did of a rock garden. You cut leaves and flowers from  various fabrics and then assemble them in layers on a background fabric.  I chose a batik quilting cotton for the background, a dark blue with splashes of white through it.  Then cut out foliage, first I cut just green shapes from fabric that looked like greenery but then I realised I actually needed leaf shapes.  So those first cuts were discarded and I "fussy cut" leaves from several different fabrics, colouring the ones that weren't quite the right green with permanent markers. Then flower shapes, and a lot of cuts to resemble tulips. I couldn't find tulip fabric so had to improvise. Also the tulip leaves were cut from other leaves and reshaped to resemble tulips. 


This is a photo of the quilt with all the flowers and leaves stitched onto it. Now I have to make a border to resemble a photo mat, I have chosen a quilting cotton in the golden orange shade of some of the flowers. Then a second border of the background fabric is  added, then a final thin binding is put around the edges. 
And the final step is to stipple quilt the entire background. This is done free- motion (feed dogs down) and I love doing this. I made a jacket a number of years ago, all the fabric was stippled before constructing the jacket and I still wear that jacket ten years later. 

A close up of the fabrics assembled and stitched to the background

A close up of some of the tulips

My hands are objecting to  the work, so I can only do about half an hour at a time, but it is so incredibly satisfying.  I already have several ideas for future projects I want to do.  


New Landscape Quilt

The other landscape quilt isn't panning out, I just can't get into it so I thought put it away for another day. So I started o...